
Hi. It’s Isaac V. Mace here the founder of Phoenix Car Mag. I’m a seasoned car enthusiast and professional with several years of experience with various vehicles and dealing with many complexities. Today, I’m going to share my insight about the vehicle’s headlights, their importance, and the correct way of replacing them.
Headlight maintenance is an important but overlooked issue. It not only relates to your on-road safety but also affects your vehicle’s appearance. Malfunctioning headlights require immediate attention as they do the job of lightening your path.
If you want to learn how to remove your headlights you’re standing in the correct place. Moreover, I’m going to provide some maintenance tips that keep your headlights as glorious as the first day.
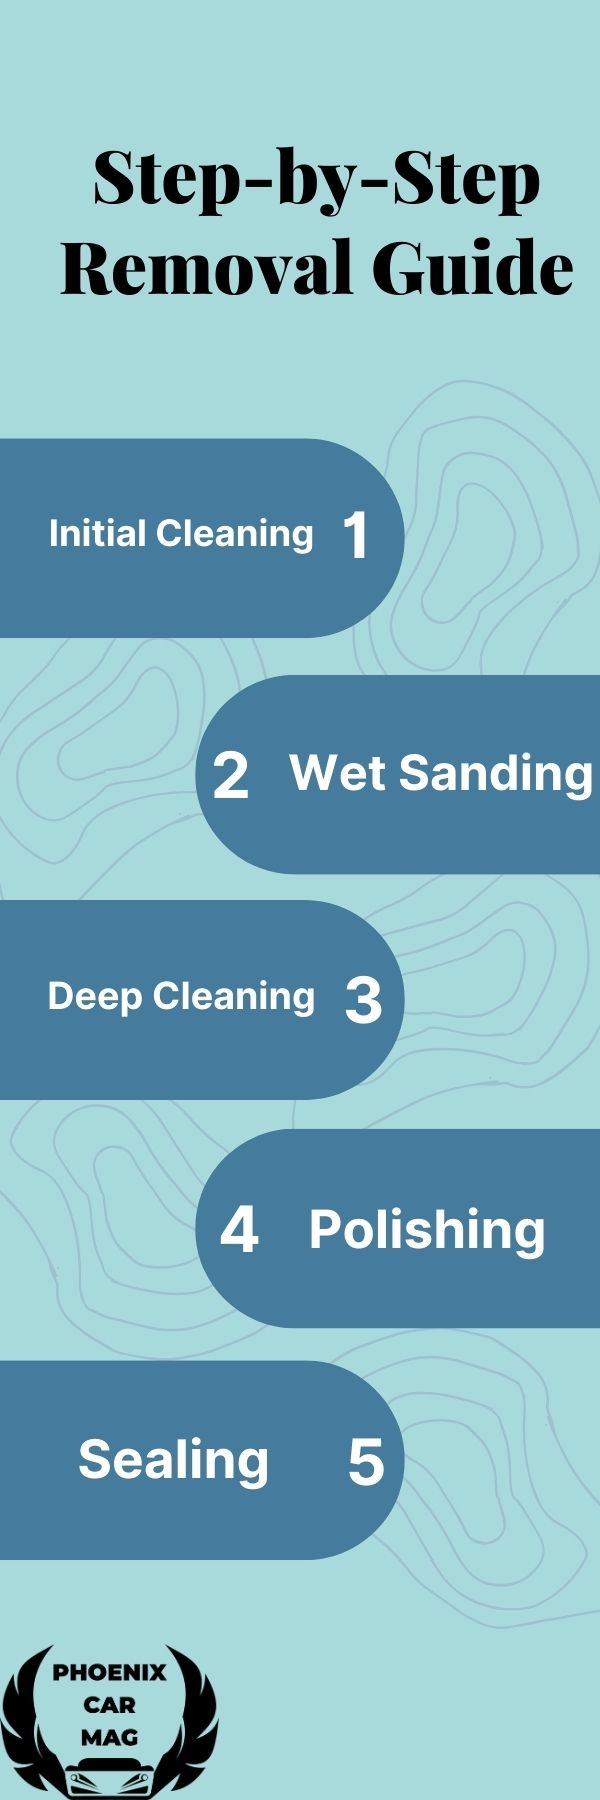
Let’s first answer this question: How to remove headlight film? First start with initial cleaning using glass cleaner and a microfiber cloth to get rid of the layer of grime. Now go to wet sanding; begin with 600 grit sandpaper, transitioning to finer grits up to 2000, using gentle motions and keeping the surface wet to avoid damage. Now clean the headlight to eliminate all dust and start polishing to restore brightness and clarity. Finally, apply a UV-resistant sealant to protect against future oxidation.
You might also enjoy: Power Window Fuse: Location + Ultimate Guide [My 2024 Update]
Understanding Headlight Film
If you’re new to this concept, it’s necessary to know that headlights are designed to both lighten your path and give your vehicle a specific appearance.
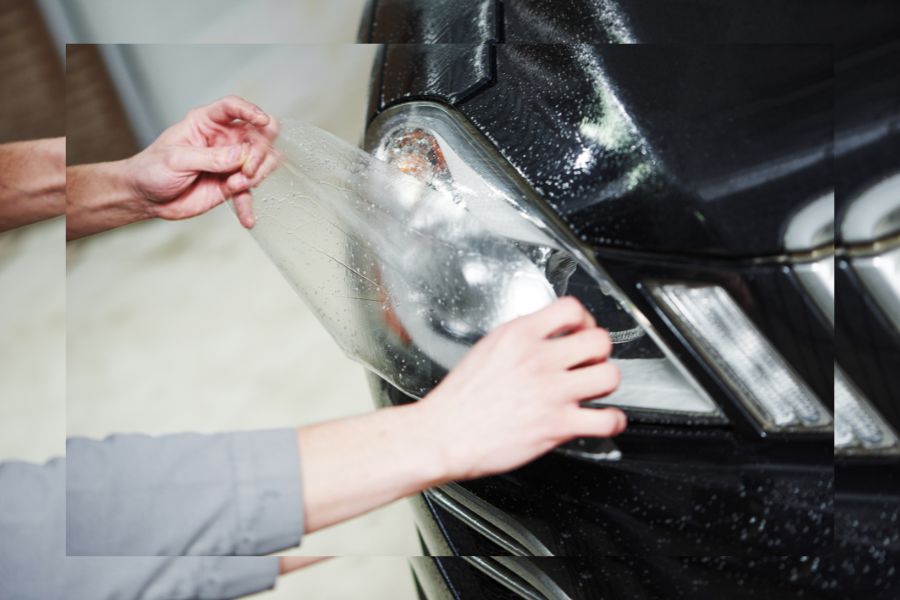
When we say headlights film what do we exactly mean? Headlight film is also called ‘fogging’. It’s nothing but a layer of oxidation that’s visible over the plastic lens of headlights. This is a typical and common incident and happens to all headlights.
It is followed by various causes. For instance, it can be due to the sun’s UV radiation. This radiation degrades the outer layer of plastic over time. As a result of this, you face a yellow headlight lens. There are also other effecting factors. They include road chemicals, wear and tear from dialysis driving, and environmental pollutants.
The mentioned filmy layer not only affects your vehicle’s appearance but also, more importantly, compromises your safety. As the yellowed headlights are unable to project the light properly, your on-road visibility is decreased and you’ll be in exposure to accidents.
There’s a common myth about headlights film. People believe that newer headlights aren’t in exposure to this phenomenon. However, even the newer ones in case of lack of care and being in harsh environments, are at high risk of being filmed. So you shouldn’t overlook this issue.
If you’re thinking that you can wipe the headlights film like specks of dust, you’re completely wrong. It’s not that simple; otherwise, we weren’t here right now. The film removal involves restoration procedures like polishing, sanding, and applying protective coatings.
One of the less-mentioned effective factors in headlight filming I the headlight’s material role in film formation. In New vehicles, manufacturers tend to use polycarbonate plastic for headlights as it is more resistant to environmental impacts.
However, polycarbonate plastic is more prone to filming rather than glass headlights used in older vehicles. It indicates the continuous and evolving challenges of automotive advancements.
In short, be attentive to your headlights to not only maintain your vehicle’s appearance but also ensure your safety. I’m going to provide you with my real-life experiences and gathered knowledge about maintaining your headlight’s appearance and functionality.
Step-by-Step Removal Guide
As I face several cases of headlight removal in Phoenix Car Mag, I want to spot a light on the headlight’s intricacies and offer you a step-by-step guide to headlight film removal. As this guidance comes from my individual experience and encounter, it offers a unique and comprehensive approach.
You might also enjoy: Can A Weak Alternator Cause Poor Engine Performance? 2023 Answer
Preparation for Removal
Before heading to the process, you’d better gather your required tools. They’re mentioned below:
- Microfiber Cloth: Enables you for gentle cleaning without scratching the light’s surface.
- Glass Cleaner: You need it for surface grim removal.
- Sandpaper: Sands are required for abrasion in different stages.
- Polishing Compound: To give the headlights their shine back after sanding.
- UV-resistant Sealant: Once the restoration process ends, use it to protect your headlights.
- Safety Gear: Gloves and safety glasses are crucial for your protection.
- Masking Tape: Use it to not scuff surrounding areas unwanted.
Keep in most that you should make safety considerations before you start.
- It’s necessary to work in a properly ventilated area to avoid inhaling chemicals.
- To protect your skin and eyes, consider wearing gloves and safety glasses.
Now let’s dive into the guide!
-
Initial Cleaning:
To prepare the headlight for the following stages, use a glass cleaner and a microfiber cloth to remove the dirt from its surface.
-
Wet Sanding:
Start sanding with gentle pressure and circulate movements. Start with a higher grit sandpaper (like 600 grit) and after a short while, the process to finer ones (up to 2000 grit). Ensure you’re not damaging the plastic by regularly wetting the surface.
-
Deep Cleaning:
After the sanding process, consider cleaning the surface completely to remove all dust and debris.
-
Polishing:
Use a high-quality polishing compound. It restores the headlight’s brightness and clarity. In case of availability use a polishing machine. Otherwise, use a clean microfiber cloth.
-
Sealing:
Ultimately, install a UV-resistant sealant to avoid future plastic oxidation. This crucial part is intended ignored in restoration procedures.
Additional Tips and Insights

-
Temperature Consideration
As you’re working with plastic, consider doing the whole restoration process at a moderate temperature due to plastic’s reaction to extreme cold or heat. Extreme temperature also affects the efficiency of cleaning products.
-
Regular Maintenance
Maintain the brightness and clarity of the headlight with occasional polishing and frequent cleaning.
-
Avoiding Common Mistakes
One of the most repeated mistakes is rushing to finish the sanding stage. Devote sufficient time to each grit to provide a smooth surface.
The factors that you just read are rarely found in typical articles or guides as they are my individual experiences. Take them seriously to give yourself proper road visibility and peace of mind on the road.
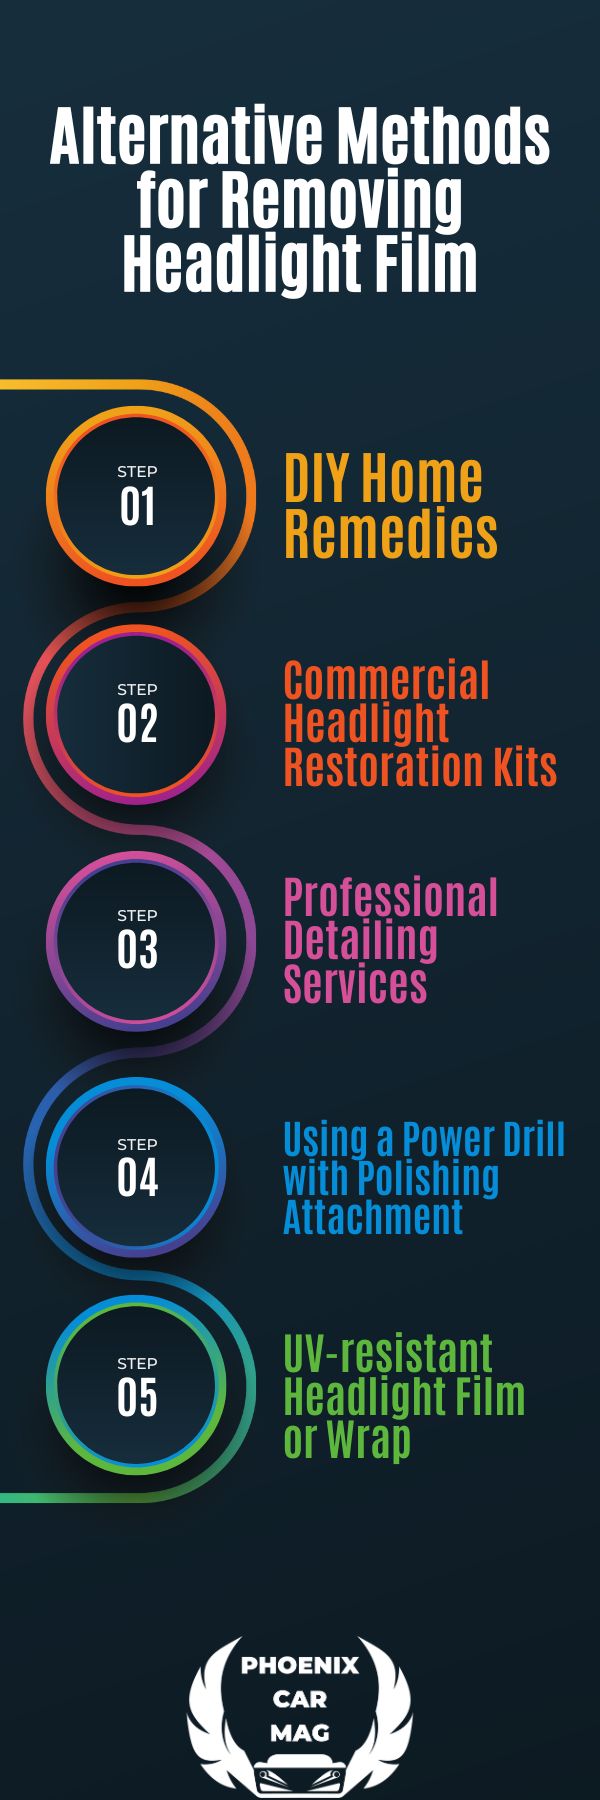
Alternative Methods
According to my long-term experience in Phoenix Car Mag, I realized that one certain solution doesn’t have to work for all cases. So, there are some alternative ways for the mentioned instruction that we’re going to discuss them. Remember that I Gained this knowledge from my experiences under different vehicle hoods.
You might also enjoy: What Happens If You Unplug Idle Air Control Valve [2024] – My Personal Experience
Alternative Methods for Removing Headlight Film
-
DIY Home Remedies:
Toothpaste Method: It’s one of the most DIY ways to use whitening toothpaste. All you have to do is apply a large amount of toothpaste on the headlight and rub it with a microfiber cloth. It’s an effective way of oxidation removal.
Vinegar solution: To remove headlight oxidation you can also mix vinegar with water and apply it on the headlight. The light will be dioxide because of the acidic nature of vinegar. Keep in mind that this process takes time so be patient.
-
Commercial Headlight Restoration Kits:
You can find these kits in automotive components shops. These kits include your required tools for restoration. It has sandpaper, a polishing compound, and a UV-resistant sealant. However, kits rent all the same so it’s necessary to read its instructions before using.
-
Professional Detailing Services:
In case of extremely oxidized headlights, consider going for a professional detailing service. The materials and techniques that they use aren’t available to average people.
-
Using a Power Drill with Polishing Attachment:
If you’re familiar with using power tools, this is a good option. You can accelerate your restoration process using a drill with an attached buffing pad. However, pay attention not to damage the headlight itself.
-
UV-resistant Headlight Film or Wrap:
It’s quite innovative to use a UV-resistant sealant after cleaning the headlight. In this way, you both remove the existing film and Avoid future ones at the same time.
Unique Insights and Precautions

-
Consider the Headlight Material
Keep in mind that in opposition to older headlights, new ones are made of polycarbonate. So they have different reactions to various cleaning products and methods in comparison with glass.
-
Test Small Area First
Always consider testing your product on a small area of the headlight to ensure there would be no harsh reaction. This factor becomes more necessary if you’re trying a DIY or using a new unfamiliar product.
-
Balancing Cost and Effort
Despite being cost-effective, DIY methods are time-consuming and effort-demanding. However, professional services can offer you a more convenient restoration process with better results.
-
Long-term Protection
Others often neglect this step. However, post-cleaning and using UV-resistant sealant are effective ways for protection.
To choose the best approach that fits your situation, you should be familiar with each method’s advantages and disadvantages. No matter which method you choose; just ensure that your selected method removes the headlight’s film with no damage to the headlight itself.
Maintenance and Prevention
Trust me regular maintenance is the most critical part of extending the life of headlights and keeling their brightness and clarity. I mentioned before that it’s always a better idea to prevent rather than to fix it.
This perspective makes it necessary to take these approaches as proactive ones. I’m going to share a combination of my explored tips during my long-term experience and the methods that were invented before and are effective.
You might also enjoy:Engine Knock on Startup Then Goes Away – My 7 Prevention Tips
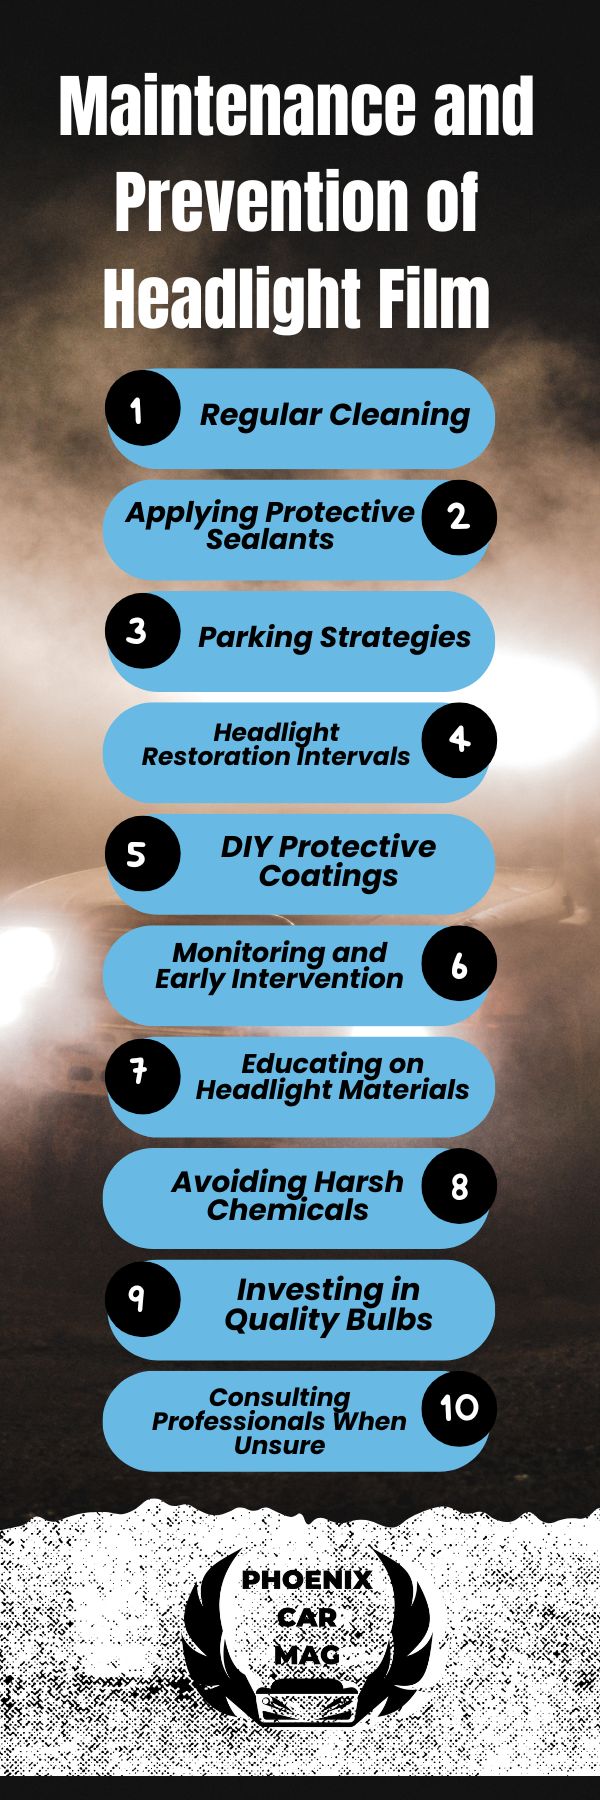
Maintenance and Prevention of Headlight Film
-
Regular Cleaning
Clean your headlights regularly as the secret point lies in regularity. You’d better clean your headlights once a month with a high-quality automotive cleaner and a sponge or microfiber cloth. This cleaning leads to the deformation of film and the buildup of dirt.
-
Applying Protective Sealants
Using a high-quality UV-resistant sealant is something that despite its importance and effectiveness, people often miss. The sealant reduces oxidation as it adds a UV-resistant layer to the light to protect it from sun radiation and environmental dirt.
-
Parking Strategies
You’d better park your car in a shaded area or case of availability, use a car cover. The more your headlights are in exposure to sunlight and radiation, the sooner their plastic lenses get oxidized and yellowed.
-
Headlight Restoration Intervals
Typically, even the well-maintained headlights wear out after a certain time. You’d better do the restoration process every year or every two years. Consider your vehicle’s age and your driving situation to make this decision.
-
DIY Protective Coatings
You shouldn’t always head to service providers. Sometimes DIY methods are effective. For instance, using the vinegar-water mixture creates a protective layer for the headlight. This is a not only effective but budget-friendly option.
-
Monitoring and Early Intervention
Be attentive to your headlights for any symptoms of fogging or filming. Early detection and intervention are simpler and more responsive.
-
Educating on Headlight Materials
Gather enough information about your headlight lenses as the polycarbonate ones are more sensitive than glass. So you should make different considerations.
-
Avoiding Harsh Chemicals
Avoid using adverse materials and only go for specialized materials for the car’s exterior.
-
Investing in Quality Bulbs
Consider spending more money to buy a high-quality bulb. It’s a wise investment because first, these bulbs improve your visibility and second, they postpone the headlight’s degradation as they reduce the heat impact on headlights.
-
Consulting Professionals When Unsure
In case of are hesitant about proper products or methods, feel free to consult with a mechanic. They can help you and decrease the risk of potential damages and problems.
You might also enjoy: 2013 Lexus CT 200h Problems: 7 Issues You MUST Know
Unique Insights

1. Understanding Your Environment
Be aware of the crucial role of your environment in your headlight’s performance. For instance, people who live in coastal areas with salt air are struggling with their headlight’s premature oxidation.
2. Custom Solutions for Different Vehicles
Due to different designs and headlight materials, each headlight may have unique effective approaches.
3. Balance Between DIY and Professional Care
We can’t ignore that DIY is more budget-friendly, however, we also can’t neglect its limitations. For high-end luxury vehicles or excellent results, you’d better handle your headlights to a service center.
Briefly, to have clear, bright, and responsive headlights that ensure your safety and visibility on the road, you should be attentive to regular maintenance, use proper products, and choose the best approaches. In addition to your safety, these factors extend and ensure your headlight’s lifespan.
You might also enjoy: I Found 10 Reasons Why Your Car Battery Smoking [2023]
Conclusion
To wrap up, it’s worth mentioning the additional prevention tips. I learned these approaches from Phoenix Car Mag and trust me, these small yet effective tips are game-changing.
In this article, we mentioned the important but overlooked role of headlights in the vehicle’s appearance and safety matters. We provided solutions for removing the headlight film ranging from DIY methods to professional help.
I emphasized the fact that despite the commonality of these approaches, each car might have specific requirements that you should refer to your manual or consult with a professional to find out.
All I mentioned here was gathered from my hands-on experience in Phoenix Car Mag and what I’ve encountered in my real life.
You might underrate these factors but be attentive to the importance of regular cleaning, using UV-resistant sealant, and parking a car in shaded areas. They provide a high rise in your headlight’s longevity and clarity.
Consider the fact that each car requires its specific needs. According to your car’s model and specifications, be familiar with your headlight maintenance approaches. This process requires you regular attention and care but you can take it as an investment for your safety and convenience.
Finally, I recommend you include the headlights check in your regular maintenance schedule to ensure your visibility on the road. Keep the mentioned tips in mind and use them to maintain your headlights as clear and bright as their first day.
FAQs
- How do you get the headlight film off?
It’s recommended to begin with cleaning the headlight. Clean it with a microfiber cloth and proper automotive cleaner. Then you should proceed to sand the lens. You should do it with gentle pressure and in a circular movement. Once it is finished, polish the lens with a high-quality compound. Ultimately, apply a UV-resistant sealant for protection. This is a time-consuming but rewarding process.
- Can you remove the headlight tint?
Definitely. It’s possible. For easier removal, I often use a hairdryer or heat gun. I use adhesive remover or a vinegar-water mixture to clean sticky residues. It’s important to work gently to avoid damaging the headlight.
- Does WD-40 remove headlight haze?
Yes, it’s a responsive solution. All you need to do it to spray it on the headlight and rub it with a microfiber cloth. For mild haziness, you can go for this temporary solution but for severe cases, you should do a full restoration process.
- How do you get rid of cloudy headlights?
The only solution is cleaning the headlight after a dine sanding and then polishing it. As a result of this approach, the outer layers of oxidation are removed and the underneath plastic is revealed. Once you’ve finished, apply a UV-resistant sealant to prevent future cloudiness.
- How to remove headlight film with toothpaste?
A whitening toothpaste can be a highly effective solution. Apply a generous amount of it on the headlight and rub it with a dry soft cloth. It’s a responsive yet budget-friendly solution. For more severe cases, consider referring to a service center.
- What is the best product to remove haze from headlights?
In my opinion, nothing can be more effective and convenient than a high-quality restoration kit as it’s a one-stop solution. It consists of all you need. A sandpaper, polishing compound, and protective sealants. It provides a solution for both flimsy removal and prevention steps afterward.
- Do headlight haze removers work?
Yes. You can trust them, especially the ones that come in a complete restoration kit. They’re designed to remove the oxidation that haziness is followed by. But its responsiveness depends on your proper application and the severity of the haziness you’re dealing with.
Keep in mind that for each situation and headlight, you should make different considerations and make different interventions. So always be mindful of the product’s instructions to avoid damaging your headlights.

![Brake Fluid Change: Costs + Signs + Everything [2024]](https://phoenixcarmag.com/wp-content/uploads/2024/01/Brake-Fluid-Change-Costs-Signs-Everything-2024-2-308x180.jpg)

![Lexus GX 470 Towing Capacity [2023 Update]](https://phoenixcarmag.com/wp-content/uploads/2023/10/Lexus-GX-470-Towing-Capacity-2023-Update.jpg "Lexus GX 470 Towing Capacity [2023 Update]")